Handy-Dandy Client-to-Component Conversion Guide
December 2024

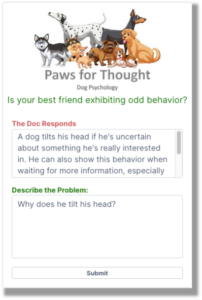
Some of you will recognize this Client; it’s used in the first Lab for the Introduction to Generative AI in Vantiq class. In the lab, students connect it to a Service that uses Generative AI to answer questions about dog behavior.
The user types in his/her question, clicks submit, and a new field appears with the answer. The user can keep asking questions, and new answers will show up in the new field.

Students don’t have to change much in the Client; it’s just there to make the labwork more visible and entertaining, so this looks like a perfect case for turning this Client into a Component. Advantages:
- Removes confusing code from visibility
- Reusable and modular
- Can be turned into an Assembly that can be installed from a catalog
- Makes for a decent use case so yours truly has something interesting to blog about
Converting what had been a whole Client into a single Component means that the new entity will now be a custom widget, and therefore will now need to behave as part of a whole. Bear this in mind because it factors greatly into how to perform the conversion.
Enough intro-fluff! Here are the steps to take to convert a Client into a Component:
Step One: Can’t Hurt to Double-Bag It
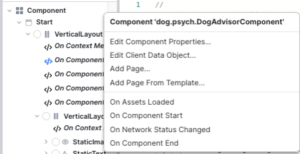
Suppose your client is already fully-enclosed in a layout widget; it may be tempting to just select it and click that “Create Component” button, but it’s a good idea to wrap your selection in another layout widget first. If not, the outermost layout widget takes on the new Component’s name.
Step Two: client.data.xxx becomes <component>.configuration.xxx
Client data objects will disappear when the new Component is made. Even if you make them again in the Component editor, they will disappear again when consumed in another Client.
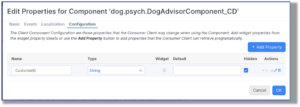
Make your data objects into Component Configuration objects instead. Then you’ll need to reference them as such in your code, like:
var cmp = client.getWidget(“ComponentName”);
cmp.configuration.CustomerID = 5;
There’s a catch though, and that is that you can’t be sure of the Component name from code within the Component, so how do you reference the Component widget?
- From the Component level, or somewhere in the Component hierarchy: Use this, e.g.:
- From somewhere else, but still within the Component: pick a Child, and reference its parent:
- getWidget(“SubmitButton”).parent.configuration.CustomerID
Confused? Let me explain. In our use case, we have onStart code for the Component itself, so we can reference configuration properties as this.configuration.property.
We also have code for a Submit button, which is a widget inside the Component, which can also reference configuration properties as this.configuration.property. So far, so good.
Finally, we have code for onDataArrived for a Data Stream. This is not part of the Component hierarchy. To get to configuration properties, I’m going to have to employ our “find a kid” hack to reference the Component widget. You’ll see this soon.


[ this.configuration.root is mentioned in the docs; this works for Widget event handlers inside the Component, but not for getting to the Component Configuration properties.]
Step Three: onStart Code becomes onComponentStart Code
Your Client or Page onStart code won’t make it into your new Component, so you’ll have to copy it from the old Client and paste it into the Component’s onComponentStart event code.
Step Four: The Care and Feeding of Data Streams
Data Streams in Components are a curious thing. Unlike Client Data Objects, Client Data Streams will become part of the new Component, by default, and their onDataArrived code as well.
When consumed, the Data Stream becomes invisible, but it’s still there, and any parts of the Component that are bound to them will react accordingly.
There’s a “Data Stream” type available in the Component configuration properties, so consumers could create their own visible DataStream, and use it to override the invisible one, while keeping the code associated with the original.
Pre-written code for DataStreams is problematic. For one thing, the code can’t get access to the Component itself, which means that it also can’t reach the Component configuration properties. To get around this, the consumer can create a Client data object and the Component onStart code can populate that anticipated client.data.<hard-name-to-avoid-collisions> object with the needed property values.
Step Five: client.getWidget (sometimes) becomes client.getComponentWidget
Relax; you don’t have to change all instances of client.getWidget in all the code associated with the Component to client.getComponentWidget. In most cases, the original code will work fine. However, as the docs explain, in some circumstances, most notably in asynchronous code blocks, the internal “magic” that keeps track of the real vs. changed-for-context names for widgets within the Component can get confused.
Steps All: Putting It Together For Our Use Case
- The first thing we should do before turning our “Dog Psychology” Client into a Component is put the outermost vertical layout “dogLayout” into another vertical layout. (We use dogLayout later in code.) That was easy, and now that outer-outermost layout took on the “DogAdvisorComponent” name.
In our “Doc Psychology” Client, we had code in three places:
- The Client onStart
- The onClick for the Submit button
- The onDataArrived for the DataStream
- The client data we had was a CustomerID, which gets set in the onStart code and is used to keep track of the displayed questions. (It’s not really managing the conversation, just a history of what the user has asked and what the AI replied, but the AI isn’t keeping track of the context.) So, we create a new Configuration integer called CustomerID in the Component -> Edit Properties -> Configuration window.
- When copying the Client onStart to the Component onStart, initially, the only change we have to make is to convert:
- data.CustomerID to this.configuration.CustomerID, to set it:
- this.configuration.CustomerID = Math.floor(Math.random() * 10000000000);
- The datastream onDataArrived code. Can I just suggest right now that I think I’d have been better off turning this Client into a Client Template instead of a Component, just because of the datastream onDataArrived? Enough whining, onward! To make my code work here:
- Needed a Client data object, which I called data.dog_psych_DogAdvisorComponent (let’s call this DAC)
- Within that object, the Component onStart code moved the CustomerID configuration property to …DAC.CustomerID
- Created another property: …dogLayout, also in the onStart code:
- client.data.dog_psych_DogAdvisorComponent.AIResponse = this.configuration.AIResponse;
- client.data.dog_psych_DogAdvisorComponent.dogLayout = client.getWidget(“dogLayout”);
- Now the code could compare the CustomerID with that sent in the stream, create a new multiline input field if needed and put it in the dogLayout, and display the AI response from the stream:
if (!client.getComponentWidget(cmp, “aiResponse”)) {
var ansPanel = new MultilineInput();
ansPanel.name = “aiResponse”;
ansPanel.heightPolicy = Widget.SizePolicy_Explicit;
ansPanel.widthPolicy = Widget.SizePolicy_SizeToParent;
ansPanel.h = 150;
ansPanel.boundValue = data.indexResponse.answer;
ansPanel.label = “The Doc Responds”;
ansPanel.labelColor = “IndianRed”;
client.data.dog_psych_DogAdvisorComponent.dogLayout.addChild(ansPanel, 3);
} else {
client.getComponentWidget(cmp, “aiResponse”).boundValue = data.indexResponse.answer;
}
- In the code above, you’ll see a couple of uses of getComponentWidget, which works just like getWidget, but with the Component as context, which I called cmp. And how did I get cmp? Like this:
- var cmp = client.data.dog_psych_DogAdvisorComponent.dogLayout.parent;
And that’s it. We’ll need the cooperation of the consumer to create a client.data.dog_psych_DogAdvisorComponent object, and to send the data for the DataStream to the desired Service Event output, but other than that, the user just has to use it, not worry about how it works.
The Takeaway:
Turning Clients into Components essentially makes them custom widgets. These can be used over and over, disguising details and code that the user doesn’t need to know, or tamper with.
May this guide prove useful when you transform your own Clients to Components!
Attachments:
You must be
logged in to view attached files.
Handy-Dandy Client-to-Component Conversion Guide
December 2024
Some of you will recognize this Client; it’s used in the first Lab for the Introduction to Generative AI in Vantiq class. In the lab, students connect it to a Service that uses Generative AI to answer questions about dog behavior.
The user types in his/her question, clicks submit, and a new field appears with the answer. The user can keep asking questions, and new answers will show up in the new field.
Students don’t have to change much in the Client; it’s just there to make the labwork more visible and entertaining, so this looks like a perfect case for turning this Client into a Component. Advantages:
Converting what had been a whole Client into a single Component means that the new entity will now be a custom widget, and therefore will now need to behave as part of a whole. Bear this in mind because it factors greatly into how to perform the conversion.
Enough intro-fluff! Here are the steps to take to convert a Client into a Component:
Step One: Can’t Hurt to Double-Bag It
Suppose your client is already fully-enclosed in a layout widget; it may be tempting to just select it and click that “Create Component” button, but it’s a good idea to wrap your selection in another layout widget first. If not, the outermost layout widget takes on the new Component’s name.
Step Two: client.data.xxx becomes <component>.configuration.xxx
Client data objects will disappear when the new Component is made. Even if you make them again in the Component editor, they will disappear again when consumed in another Client.
Make your data objects into Component Configuration objects instead. Then you’ll need to reference them as such in your code, like:
There’s a catch though, and that is that you can’t be sure of the Component name from code within the Component, so how do you reference the Component widget?
Confused? Let me explain. In our use case, we have onStart code for the Component itself, so we can reference configuration properties as this.configuration.property.
We also have code for a Submit button, which is a widget inside the Component, which can also reference configuration properties as this.configuration.property. So far, so good.
Finally, we have code for onDataArrived for a Data Stream. This is not part of the Component hierarchy. To get to configuration properties, I’m going to have to employ our “find a kid” hack to reference the Component widget. You’ll see this soon.
[ this.configuration.root is mentioned in the docs; this works for Widget event handlers inside the Component, but not for getting to the Component Configuration properties.]
Step Three: onStart Code becomes onComponentStart Code
Your Client or Page onStart code won’t make it into your new Component, so you’ll have to copy it from the old Client and paste it into the Component’s onComponentStart event code.
Step Four: The Care and Feeding of Data Streams
Data Streams in Components are a curious thing. Unlike Client Data Objects, Client Data Streams will become part of the new Component, by default, and their onDataArrived code as well.
When consumed, the Data Stream becomes invisible, but it’s still there, and any parts of the Component that are bound to them will react accordingly.
There’s a “Data Stream” type available in the Component configuration properties, so consumers could create their own visible DataStream, and use it to override the invisible one, while keeping the code associated with the original.
Pre-written code for DataStreams is problematic. For one thing, the code can’t get access to the Component itself, which means that it also can’t reach the Component configuration properties. To get around this, the consumer can create a Client data object and the Component onStart code can populate that anticipated client.data.<hard-name-to-avoid-collisions> object with the needed property values.
Step Five: client.getWidget (sometimes) becomes client.getComponentWidget
Relax; you don’t have to change all instances of client.getWidget in all the code associated with the Component to client.getComponentWidget. In most cases, the original code will work fine. However, as the docs explain, in some circumstances, most notably in asynchronous code blocks, the internal “magic” that keeps track of the real vs. changed-for-context names for widgets within the Component can get confused.
Steps All: Putting It Together For Our Use Case
In our “Doc Psychology” Client, we had code in three places:
And that’s it. We’ll need the cooperation of the consumer to create a client.data.dog_psych_DogAdvisorComponent object, and to send the data for the DataStream to the desired Service Event output, but other than that, the user just has to use it, not worry about how it works.
The Takeaway:
Turning Clients into Components essentially makes them custom widgets. These can be used over and over, disguising details and code that the user doesn’t need to know, or tamper with.
May this guide prove useful when you transform your own Clients to Components!
Attachments:
You must be logged in to view attached files.