Developer How To Series
September 2023
Integrating Vantiq Applications with web-based API’s
Event-driven means real-time means here and now.
Okay, but how do we get to the “now” and bring it to “here,” in our applications? Vantiq can integrate with lots of other entities, but today we’ll focus on just one: Web-based API’s.
Knowledge is everywhere, thanks to the Internet, and retrieving it for your application is as simple as accessing the API of the website that holds it. API calls generally follow the HTTP(S) REST API protocol, with the four methods:
· GET – for information retrieval
· POST – for creating new information
· PUT – for updating existing information
· DELETE – for removing information
Vantiq’s way of making API calls is through either polling a REMOTE Source to create incoming events, or running a VAIL SELECT statement. Here’s how to seamlessly integrate an API into your application.
Step 1: From the Add Menu, create a new Source.
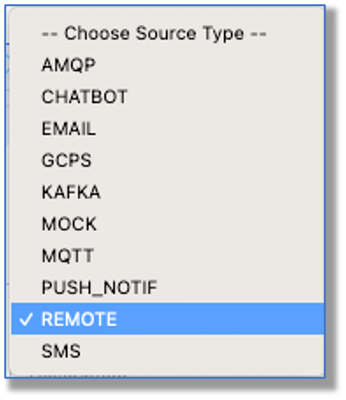
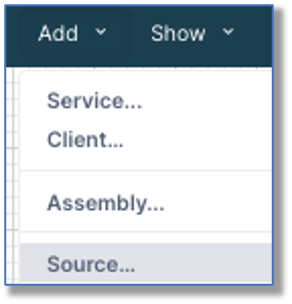 Step 2: Along with providing a name and (optional) package, choose the source type REMOTE.
The Properties to be set are now for what a website API requires:
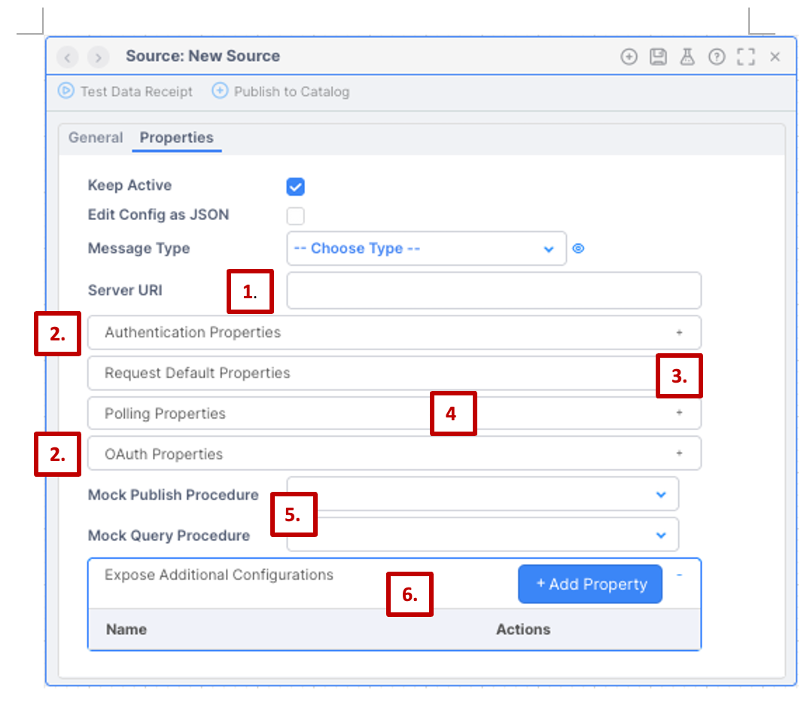
Let’s camp here for a bit, so we can go over how web-based applications communicate with each other using API’s. Refer to the screenshot numbers, below:
1. All API’s start at a web location, of course, and the “Server URI” property is that part of the web URL, also known as the “endpoint.”
2. Most API’s want proof that you’re allowed to access their service. This might be through a username and password (increasingly rare), or with a unique api key or token (more common) or through the OAuth standard (which involves a 3rd party authenticator, so the API doesn’t know the credentials). Put the relevant information here.
3. Will all your requests have at least some aspect in common? For instance, if you wanted to use the Spotify API to only retrieve artist information, the part of the request after the endpoint would always be “/artists/”. (no quotes) You can save having to type that part in later queries by putting it once in the Path here.
This is also the area where you can specify the Method, if you know what it will always be. The default is GET.
4. Polling is for making the same request on a periodic basis, sent as events, like getting the latest prices on your five favorite stocks at the top of every hour of the day. If that’s the case, be sure to complete the full call in the Request Default Properties.
5. A Source in “mock mode” does not communicate to the outside world. Instead, Mock Publish and Mock Query Procedures replace the source behavior. This is useful if you’re running a test and need specific data to come from the “source,” so you can verify how it’s processed. In that case, the test will put the source in mock mode and call those procedures instead.
6. This is a “miscellaneous” section of sorts for extra-complex API requests that need even more than what can be set up in Request Default Properties.
Take Note: Not every field needs to be filled out. The source must exist, it must be REMOTE, and the Server API needs to be provided, but that’s it.
If you set up your source to periodically poll the retrieval of information, then you’re done, congratulations! Your application has successfully integrated with the outside API, and will ingest the source information just like events from any other source. Define a schema for the event structure, create a Service to ingest the events, and go forth in the here and now!
Alternatively, if you want to query the source from within the application, keep reading for…
Step 3: Use VAIL’s SELECT or PUBLISH statements to interact with the source.
This is the full syntax of the SELECT statement for working with sources:
SELECT FROM SOURCE <source_name>
WITH <property> = <property_value>
[ , …]
And here is the PUBLISH statement:
PUBLISH { <property> : <property_value> [, …]} TO SOURCE <source_name> USING { method: <method>, path: <path>}
The properties that can be used are listed in the Remote Source Integration documentation, a good read I highly recommend! As an example, if a property is QUERY, that is what would appear after the “?” in a URL-based query. METHOD is any of the four REST methods mentioned earlier. BODY is the REST call payload that gets sent to the remote source, usually in JSON format, and highly dependent upon what the API expects. All supplied property values are treated as strings, so use quotations around them.
By default, a SELECT is a GET method, and PUBLISH is a POST, but both can be overridden. PUBLISH should not be used for GET, because it is specifically designed to receive no response.
Well, that’s all the time we have for today; now go forth in – what’s that? You want to see some real-world examples? All right, let me go through my closets…
Example 1: Polling to create a steady stream of events
I use this API to get “patient” information for healthcare application examples. In the Properties for the Source, I set the URI to the API endpoint:

No authentication required, but I set a few query parameters to get my “patients” from only four countries, and send me a record as a published event.

Since the default method is GET, this is all I needed to complete the full query, so now I just set it to send me a published event once every 5 seconds:

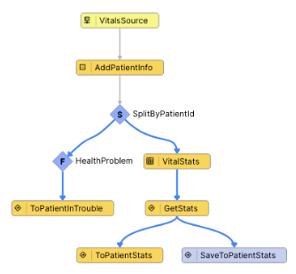
After that, it was just a matter of creating an Internal Event Handler in a Service to ingest the Source event, and build the rest of the logic to work with it.
Example 2: SELECT location data
This source also required no authentication, so all I supplied was the Server URL endpoint, which is the entry point for the API.
Then I added a VAIL block activity task to use event properties to build the query for the SELECT. Here’s most of the code:
var path1 = { “q” : event.FromAddString }
try {
var mess = SELECT FROM SOURCE com.acme.GeoCoder WITH QUERY = path1
event.geos.FromAdd.coordinates = [mess[0][0].lon, mess[0][0].lat]
}
catch(error) {… }
Notice this is in a TRY/CATCH block, which is always a good idea, especially when working with an outside entity.
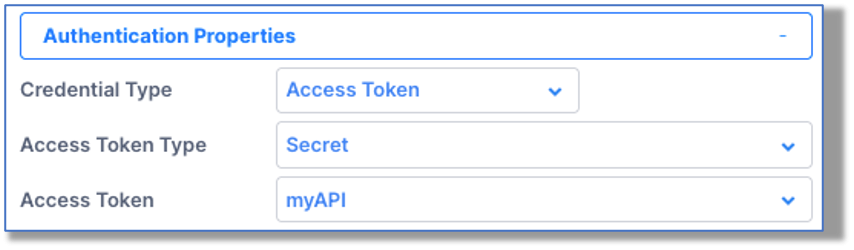
Example 3: Authenticating with a Secret and using a BODY
After setting the Server URI, all I needed for this source was the Authentication Properties. I created a Secret for my api key (see last month’s Tiq’s & Tricks!), which I could select from the drop-down:
To use the source as part of a Service Visual Event Handler, you can add code in a VAIL block, like I did in Example 2, or write a procedure and call it from a Procedure Activity Task, like I did this time:
package grease.monkey
PROCEDURE MonkeyChat.querySource(key Integer, event Object)
var content = event.msg
var body = {
“model”: “gpt-3.5-turbo-16k-0613”,
“messages”: [{“role”: “user”, “content”: content}],
“temperature”: 0.7
}
var astReply = {
custID: event.custID,
role: “assistant”,
msg: “”
}
try {
astReply.msg = SELECT FROM SOURCE grease.monkey.chatSource WITH BODY = body
return astReply
}
catch(error) ….
This is for the OpenAI API, and a fair amount of information is required in the body; be sure to read the API documentation carefully in every case!
Example 4: A PUBLISH statement against Vantiq’s API
Sure, Vantiq has an API, and you can access it from the IDE just like any other API. Use an access token for authentication in the Source definition. Here, I’m creating a new standard type:
PUBLISH { body: {“name”: “DelReq3”,
“properties”: {
“Customer”: { “type”: “String” },
“FromAdd”: {“type”: “Object” }
}}} to SOURCE VantiqAPI using { path: “https://dev.vantiq.com/api/v1/resources/types/”, method: “POST”, contentType: “application/json”}
As expected, the DelReq3 type comes into existence as an empty standard type with “Customer” (string) and “FromAdd” (object) properties.
Oooff, this blog article is showing book-length ambitions, but let me leave you with a trouble-shooting checklist, should you find difficulties getting the API to work in the application. Go through each of these in order, and when the answer is yes, try the next step:
· Is your authentication typed correctly?
· Does it work as a full browser window URL?
· Does it work in Postman or a curl command?
· Try the query with a SELECT in a VAIL procedure, and keep working on the request, paying attention to what the error messages say.
Usually, my problems resolve by the first two bullets, but I’ve been known to check my query structure in Postman or curl if I’m not sure how to fill out the source properties or structure the query for the SELECT statement. With a little practice, it will come naturally.
Here’s to the here and now!

Developer How To Series
September 2023
Integrating Vantiq Applications with web-based API’s
Event-driven means real-time means here and now.
Okay, but how do we get to the “now” and bring it to “here,” in our applications? Vantiq can integrate with lots of other entities, but today we’ll focus on just one: Web-based API’s.
Knowledge is everywhere, thanks to the Internet, and retrieving it for your application is as simple as accessing the API of the website that holds it. API calls generally follow the HTTP(S) REST API protocol, with the four methods:
· GET – for information retrieval
· POST – for creating new information
· PUT – for updating existing information
· DELETE – for removing information
Vantiq’s way of making API calls is through either polling a REMOTE Source to create incoming events, or running a VAIL SELECT statement. Here’s how to seamlessly integrate an API into your application.
Step 1: From the Add Menu, create a new Source.
The Properties to be set are now for what a website API requires:
Let’s camp here for a bit, so we can go over how web-based applications communicate with each other using API’s. Refer to the screenshot numbers, below:
1. All API’s start at a web location, of course, and the “Server URI” property is that part of the web URL, also known as the “endpoint.”
2. Most API’s want proof that you’re allowed to access their service. This might be through a username and password (increasingly rare), or with a unique api key or token (more common) or through the OAuth standard (which involves a 3rd party authenticator, so the API doesn’t know the credentials). Put the relevant information here.
3. Will all your requests have at least some aspect in common? For instance, if you wanted to use the Spotify API to only retrieve artist information, the part of the request after the endpoint would always be “/artists/”. (no quotes) You can save having to type that part in later queries by putting it once in the Path here.
This is also the area where you can specify the Method, if you know what it will always be. The default is GET.
4. Polling is for making the same request on a periodic basis, sent as events, like getting the latest prices on your five favorite stocks at the top of every hour of the day. If that’s the case, be sure to complete the full call in the Request Default Properties.
5. A Source in “mock mode” does not communicate to the outside world. Instead, Mock Publish and Mock Query Procedures replace the source behavior. This is useful if you’re running a test and need specific data to come from the “source,” so you can verify how it’s processed. In that case, the test will put the source in mock mode and call those procedures instead.
6. This is a “miscellaneous” section of sorts for extra-complex API requests that need even more than what can be set up in Request Default Properties.
Take Note: Not every field needs to be filled out. The source must exist, it must be REMOTE, and the Server API needs to be provided, but that’s it.
If you set up your source to periodically poll the retrieval of information, then you’re done, congratulations! Your application has successfully integrated with the outside API, and will ingest the source information just like events from any other source. Define a schema for the event structure, create a Service to ingest the events, and go forth in the here and now!
Alternatively, if you want to query the source from within the application, keep reading for…
Step 3: Use VAIL’s SELECT or PUBLISH statements to interact with the source.
This is the full syntax of the SELECT statement for working with sources:
And here is the PUBLISH statement:
The properties that can be used are listed in the Remote Source Integration documentation, a good read I highly recommend! As an example, if a property is QUERY, that is what would appear after the “?” in a URL-based query. METHOD is any of the four REST methods mentioned earlier. BODY is the REST call payload that gets sent to the remote source, usually in JSON format, and highly dependent upon what the API expects. All supplied property values are treated as strings, so use quotations around them.
By default, a SELECT is a GET method, and PUBLISH is a POST, but both can be overridden. PUBLISH should not be used for GET, because it is specifically designed to receive no response.
Well, that’s all the time we have for today; now go forth in – what’s that? You want to see some real-world examples? All right, let me go through my closets…
Example 1: Polling to create a steady stream of events
I use this API to get “patient” information for healthcare application examples. In the Properties for the Source, I set the URI to the API endpoint:
No authentication required, but I set a few query parameters to get my “patients” from only four countries, and send me a record as a published event.
Since the default method is GET, this is all I needed to complete the full query, so now I just set it to send me a published event once every 5 seconds:
After that, it was just a matter of creating an Internal Event Handler in a Service to ingest the Source event, and build the rest of the logic to work with it.
Example 2: SELECT location data
This source also required no authentication, so all I supplied was the Server URL endpoint, which is the entry point for the API.
Then I added a VAIL block activity task to use event properties to build the query for the SELECT. Here’s most of the code:
Notice this is in a TRY/CATCH block, which is always a good idea, especially when working with an outside entity.
Example 3: Authenticating with a Secret and using a BODY
After setting the Server URI, all I needed for this source was the Authentication Properties. I created a Secret for my api key (see last month’s Tiq’s & Tricks!), which I could select from the drop-down:
To use the source as part of a Service Visual Event Handler, you can add code in a VAIL block, like I did in Example 2, or write a procedure and call it from a Procedure Activity Task, like I did this time:
This is for the OpenAI API, and a fair amount of information is required in the body; be sure to read the API documentation carefully in every case!
Example 4: A PUBLISH statement against Vantiq’s API
Sure, Vantiq has an API, and you can access it from the IDE just like any other API. Use an access token for authentication in the Source definition. Here, I’m creating a new standard type:
As expected, the DelReq3 type comes into existence as an empty standard type with “Customer” (string) and “FromAdd” (object) properties.
Oooff, this blog article is showing book-length ambitions, but let me leave you with a trouble-shooting checklist, should you find difficulties getting the API to work in the application. Go through each of these in order, and when the answer is yes, try the next step:
· Is your authentication typed correctly?
· Does it work as a full browser window URL?
· Does it work in Postman or a curl command?
· Try the query with a SELECT in a VAIL procedure, and keep working on the request, paying attention to what the error messages say.
Usually, my problems resolve by the first two bullets, but I’ve been known to check my query structure in Postman or curl if I’m not sure how to fill out the source properties or structure the query for the SELECT statement. With a little practice, it will come naturally.
Here’s to the here and now!