Developer How To Series
February 2025
Using the Video Source
There’s a new Source in town:
That’s right, there’s now a really easy way to bring images from videos into your projects. Not only that, but the video can come from the camera on your local machine, a URL on the internet, or even a file (good for testing), as long as the Vantiq server can reach it.
Disclaimer #1: Let me explain that last bit: If your Vantiq server is in the cloud, and you want to access a camera on either your machine or local network, you’re going to have to figure out a way for Vantiq to be able to reach it through your network’s firewall. Security, and all that.
If Vantiq is on the Edge, then getting to local resources is a no-brainer. Just input the local address to your camera, and enjoy.
But, I’m going to assume you’re on a Cloud server, like dev.vantiq.com, and want to snap footage from a live feed somewhere. Which leads me to…
Disclaimer #2: A lot of the URL’s out there with “live cams” aren’t really IP’s for the live cams, but for the website or service displaying them. To see what I mean, click on Poppy: 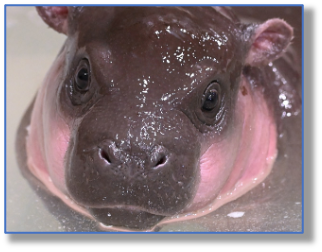
(That cam’s streaming through YouTube, darnit.)
It’s not always obvious, but you’ll have a strong inkling that the site won’t work when you see something like:
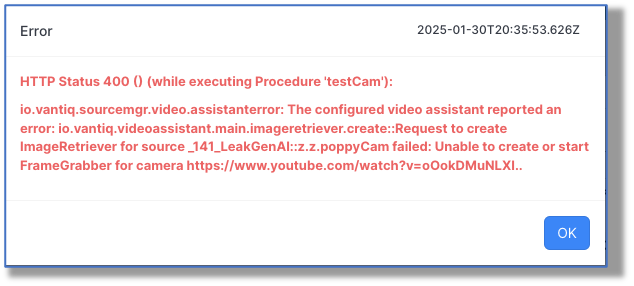
…because you’re insightful that way.
Now that you’re thoroughly sick of me droning on about disclaimers, let’s move on to actually making and using a Video source.
Step 1: Set up the Video Source
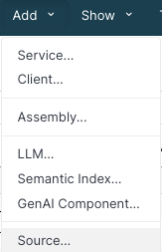
I found a working camera on-line, so let’s go to the Add menu and choose Source…
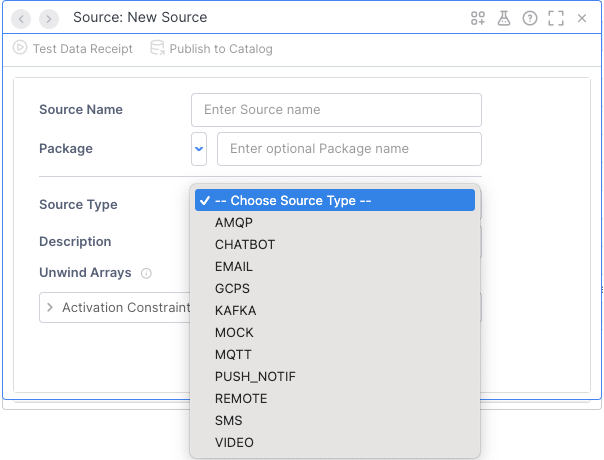
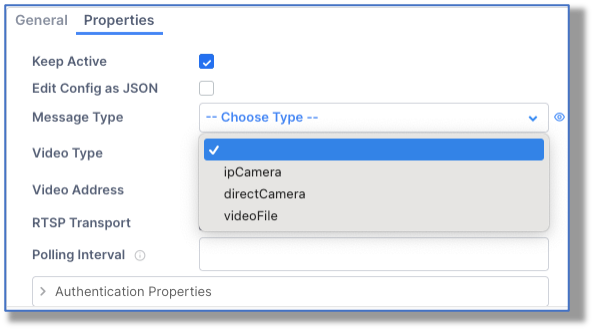
Provide the name and package, and Source as the Source Type. In the Properties tab, Video Type in this case will be ipCamera:
Then add in the URL for the Video Address, and save. And that was that. (I didn’t need to set the Real Time Streaming Protocol Transport in this case.)
Step 2: Take a Snapshot from the Video
I created a simple procedure to capture the shot and save it in my project Documents:
PROCEDURE testCam(imageName String, prompt String, sourceName String)
var imageRef = “system.documents/public/” + imageName
var imagePath = “https://dev.vantiq.com/ui/docs/NS/myNS/” + imageName
var pic = select from source @sourceName with saveAs = imageRef
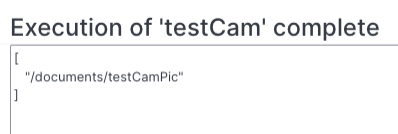
You’ll get an acknowledgement when the procedure is executed, something like:
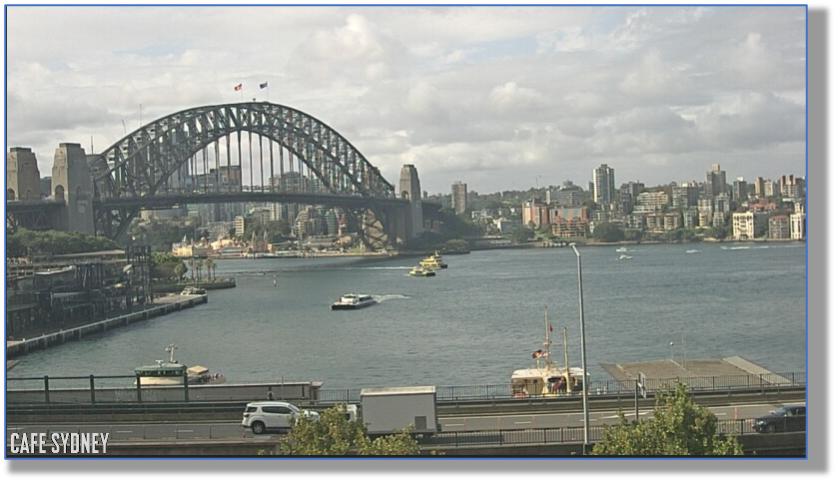
…and we can go to our Documents from the Show -> Documents list, and right-click on the testCamPic file to view it:
Step 3: Use AI To Describe the Snapshot
Let’s take advantage of a multi-modal LLMs to get a description of the image from the video. To do that we’ll need to build the prompt inside a “human” type message, and then query the LLM:
var msg = io.vantiq.ai.ChatMessage.buildHumanMessage([
{type: “text”, text: prompt},
{type: “image_url”, image_url: {url : imagePath}}
])
var answer = io.vantiq.ai.LLM.submitPrompt(“gpt”, [msg])
Putting it all together then:

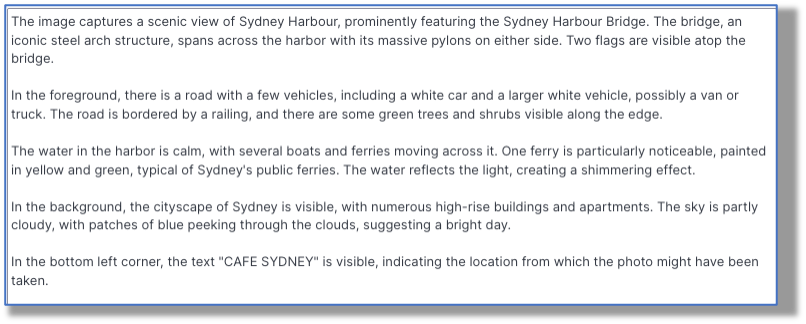
Yields:
Step 4: Use Your Imagination
Ask more specific questions about your pictures:
- “Is it day or nighttime?”
- “Are there any people wearing blue?”
- “Is there a car parked in the lot closest to the ‘No Parking’ sign?”
And based on the answer, the AI could call a Tool to handle the condition revealed.
Conclusion: A Picture Really Is Worth 1000 Words
As AI capabilities grow, so do Vantiq’s abilities to take advantage of them. This built-in Video Source makes it easy to capture live images from cameras all over the world, which can then be automatically evaluated and acted upon by generative, agentic AI.
Attachments:
You must be
logged in to view attached files.

Developer How To Series
February 2025
Using the Video Source
There’s a new Source in town:
That’s right, there’s now a really easy way to bring images from videos into your projects. Not only that, but the video can come from the camera on your local machine, a URL on the internet, or even a file (good for testing), as long as the Vantiq server can reach it.
Disclaimer #1: Let me explain that last bit: If your Vantiq server is in the cloud, and you want to access a camera on either your machine or local network, you’re going to have to figure out a way for Vantiq to be able to reach it through your network’s firewall. Security, and all that.
If Vantiq is on the Edge, then getting to local resources is a no-brainer. Just input the local address to your camera, and enjoy.
But, I’m going to assume you’re on a Cloud server, like dev.vantiq.com, and want to snap footage from a live feed somewhere. Which leads me to…
Disclaimer #2: A lot of the URL’s out there with “live cams” aren’t really IP’s for the live cams, but for the website or service displaying them. To see what I mean, click on Poppy:
(That cam’s streaming through YouTube, darnit.)
It’s not always obvious, but you’ll have a strong inkling that the site won’t work when you see something like:
…because you’re insightful that way.
Now that you’re thoroughly sick of me droning on about disclaimers, let’s move on to actually making and using a Video source.
Step 1: Set up the Video Source
I found a working camera on-line, so let’s go to the Add menu and choose Source…
Provide the name and package, and Source as the Source Type. In the Properties tab, Video Type in this case will be ipCamera:
Then add in the URL for the Video Address, and save. And that was that. (I didn’t need to set the Real Time Streaming Protocol Transport in this case.)
Step 2: Take a Snapshot from the Video
I created a simple procedure to capture the shot and save it in my project Documents:
You’ll get an acknowledgement when the procedure is executed, something like:
…and we can go to our Documents from the Show -> Documents list, and right-click on the testCamPic file to view it:
Step 3: Use AI To Describe the Snapshot
Let’s take advantage of a multi-modal LLMs to get a description of the image from the video. To do that we’ll need to build the prompt inside a “human” type message, and then query the LLM:
Putting it all together then:
Yields:
Step 4: Use Your Imagination
Ask more specific questions about your pictures:
And based on the answer, the AI could call a Tool to handle the condition revealed.
Conclusion: A Picture Really Is Worth 1000 Words
As AI capabilities grow, so do Vantiq’s abilities to take advantage of them. This built-in Video Source makes it easy to capture live images from cameras all over the world, which can then be automatically evaluated and acted upon by generative, agentic AI.
Attachments:
You must be logged in to view attached files.