Developer ‘Tiqs & Tricks
March 2026
Using a CamelConnector with Vantiq

Should you let the Camel in the tent?
If it’s Apache Camel, and integrating with a Camel-compliant entity into Vantiq is your goal, then the answer is often yes!
If you’re on Vantiq’s public catalog (or your server installation installed a similar one) where you can access the CamelAssemblies, and one of those meets your integration needs, then check out this earlier article to learn more.
Vantiq also has its own CamelComponent for connecting to the CamelComponents of a myriad other web-based services, and that’s what we’re going to cover today.
How Vantiq Camel Connections Work
Vantiq integrates messages from other web-based entities using Camel as an Enterprise Extension. The Camel Connector uses the Camel Component to build the appropriate Apache Camel application, which runs locally to the user. The application, in turn, is directed to the 3rd party’s CamelConnector by configured routing.

From the user’s perspective, this is just as easy as using any other Source. From a developer’s perspective, the process of integrating an Enterprise Extension Source is pretty straightforward, even if there’re more steps involved. The Camel Connector part of it is … a bit harder, but I’ll show exactly how I got the use case to work, and that will help!
Our Use Case: Integrate with the Geocoder Component
Google’s Geocoder web service is a handy tool for looking up addresses from geocodes, or getting geocodes from addresses. It has a Camel Component, so we can use it to connect to ours on the Vantiq platform.
Step 1: Clone the Extension Sources Repository
Log into GitHub and navigate to the Vantiq repos. Vantiq/vantiq-extension-sources is what you want. Clone the code to a directory in your filesystem.
git clone https://github.com/Vantiq/vantiq-extension-sources.git
In the repo directory, move to the vantiq-extension-sources directory and run
./gradlew camelConnector:assemble
Note: This isn’t going to work if you don’t have JAVA JDK 17 installed, and your JAVA_HOME environment variable set to the correct JAVA path. Here’s a Linux example:
JAVA_HOME = “/Library/Java/JavaVirtualMachines/openjdk-17.jdk/Contents/Home”
Step 2: Move & Uncompress the Generated Program Files
Running the gradle command in the last step created file builds in both zip and tar formats. Copy one of those from <yourDir>/vantiq-extension-sources/camelConnector/build/distributions to wherever you want the program to live on your machine, and uncompress it there.
Step 3: Create a Server Config File
Go to the the install location and create a server.config filename. It will look like this:
authToken=<token to the Vantiq Namespace>
sources=<whatever you want to call your source, i.e: CamelGEO>
targetServer=<URL to your Vantiq installation>
sendPings=true
Step 4: Create a Source Type for the IDE
Create a JSON doc with a name like “CamelGEO.json” and contents like:
{
“name” : “CamelGEO”,
“baseType” : “EXTENSION”,
“verticle” : “service:extensionSource”,
“config” : {}
}
Apologies! This “quote” editor ignores spaces and tabs, so I can’t indent. And before you ask, “ ” didn’t work either.)
If you haven’t done so already, install the Vantiq CLI and update your profile with the info you need for the Namespace and access token you’ve got for the server.config file already. Then run:
vantiq -s load sourceimpls CamelGEO.json
Hop into your Namespace for a sec and choose Add -> Source. Take a look at the available types:

You should see that your source is now a selectable choice.
Step 5: Create a New Source and Reference a Routes Document
Well, now that you can create a CamelGEO source, let’s do that. I’m calling mine CamelGEO, (because I’m super creative that way.) In the configuration pane for the Properties tab, we need to add some JSON. The properties that can be set are listed in Vantiq’s camelConnector GitHub repo README. In our case, we’re keeping it pretty simple:
{
“camelRuntime”: {
“appName”: “CamelGEO”,
“routesDocument”: “CamelGEOBothRoutes.yml”,
“componentProperties”: [{
“componentName”: “geocoder”,
“componentProperties”: {}
}]
},
“general”: {}
}
Bear in mind that the componentName is the name of the 3rd party entity to which you are connecting; make sure it’s spelled correctly, case and all.
You might also be tempted to add authentication information in the componentProperties, but that only works at the endpoint level, not at the component level.
All we need to set is the camelRuntime.routesDocument with the name of the YAML file that defines the Geocoder Camel Component routes we’re going to use. The appName would have defaulted to camelConnectorApp. If I’d needed to add security information like a ClientId or access token, that would be added into other properties. (Again, see that README file.)
Step 6: Create the Routes Document
Remember how in the last step, we made a property for routesDocument? Well, that actually has to exist, as a project document. These documents could be in XML or YAML formats. Here, I’m using YAML.
I’ll put the text at the very bottom of this article, so you can copy it, but just in case, I’m showing a screenshot of this, to make sure the spacing is exact:
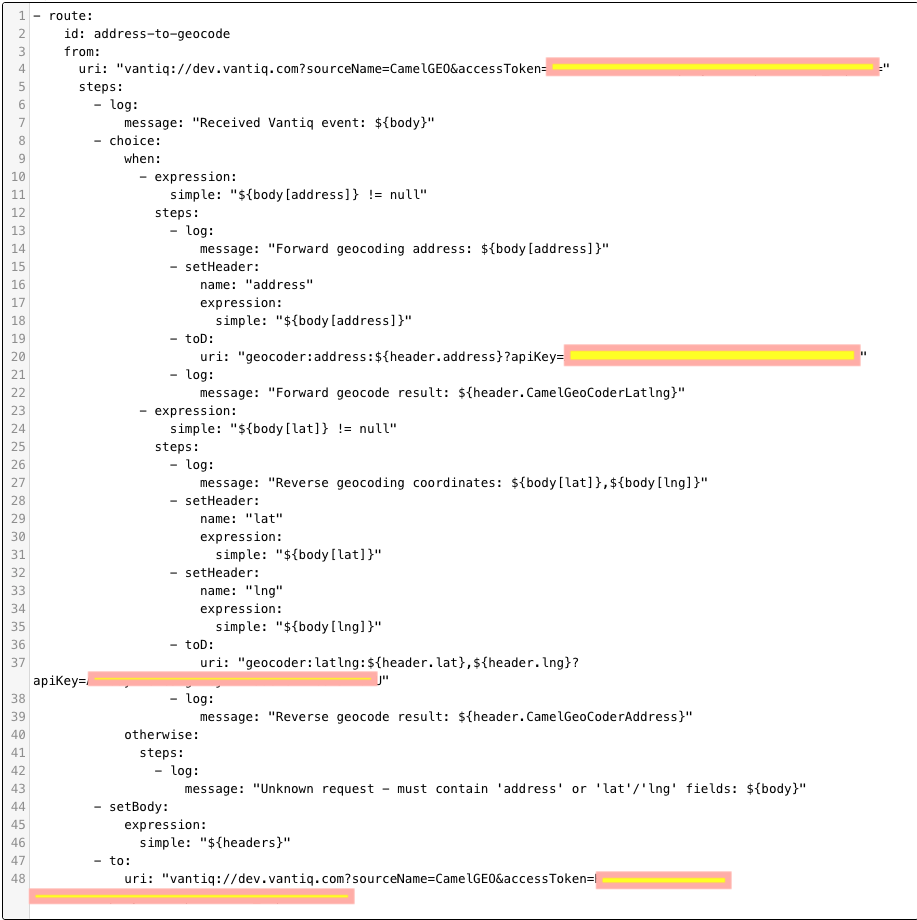
Hooboy, what can I say about getting the routes right? So many pitfalls:
- • The routes must start with a dash: – route:
• steps should be two spaces under from (AI “help” gets this wrong a lot; don’t ask me how I know.)
• Be sure to put all access tokens, API keys, etc. in this file
• Vantiq is expecting a java.util.Map sent back, so the setBody section is returning the header map, which is in the right format.
• Spacing in general is soooooo picky, picky, picky, and far too often cutting and pasting in some of the lines results in misalignment.
Step 7: Start the Apache Camel Application
In your terminal window, navigate to where you installed and expanded the .zip or .tar distribution from Step 2. Make sure your server.config file is at the installation directory level run:
./camelConnector/bin/camelConnector
The application should say it successfully connected to the source in your project Namespace, and will stay up, sharing helpful DEBUG messages for everything that happens to that source from now on.
Step 8: Enjoy your New Source
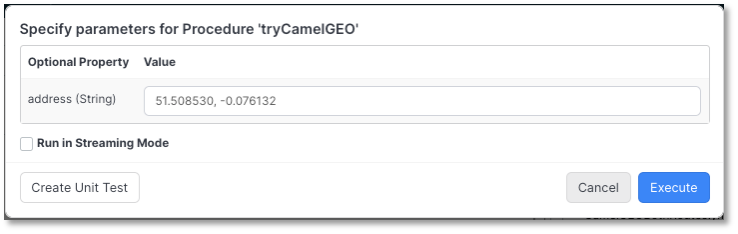
I have a simple procedure for entering a value and getting a Geocode back, or vice-versa:
PROCEDURE tryCamelGEO(address String)
try {
SELECT ONE * from SOURCE CamelGEO as result WITH
address: address
} catch (error) {
exception(error.code, error.message)
}
return result
And here’s what it looked like when it was run:
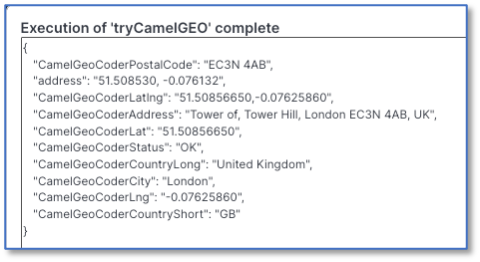
Conclusion:
Using Vantiq’s Camel Assembly options makes for much less work, but in cases where the “kamelet” isn’t available, you can still integrate a 3rd party Camel Connector with your Vantiq project. Read the Camel Connector documentation for your entity carefully, read the Vantiq instructions for the Camel Connector in the GitHub repository carefully, and you should be fine!
Click here to download the YAML file I used. I had to upload it as .txt file, but just change the extension to .yml.
Attachments:
You must be
logged in to view attached files.

Developer ‘Tiqs & Tricks
March 2026
Using a CamelConnector with Vantiq
Should you let the Camel in the tent?
If it’s Apache Camel, and integrating with a Camel-compliant entity into Vantiq is your goal, then the answer is often yes!
If you’re on Vantiq’s public catalog (or your server installation installed a similar one) where you can access the CamelAssemblies, and one of those meets your integration needs, then check out this earlier article to learn more.
Vantiq also has its own CamelComponent for connecting to the CamelComponents of a myriad other web-based services, and that’s what we’re going to cover today.
How Vantiq Camel Connections Work
Vantiq integrates messages from other web-based entities using Camel as an Enterprise Extension. The Camel Connector uses the Camel Component to build the appropriate Apache Camel application, which runs locally to the user. The application, in turn, is directed to the 3rd party’s CamelConnector by configured routing.
From the user’s perspective, this is just as easy as using any other Source. From a developer’s perspective, the process of integrating an Enterprise Extension Source is pretty straightforward, even if there’re more steps involved. The Camel Connector part of it is … a bit harder, but I’ll show exactly how I got the use case to work, and that will help!
Our Use Case: Integrate with the Geocoder Component
Google’s Geocoder web service is a handy tool for looking up addresses from geocodes, or getting geocodes from addresses. It has a Camel Component, so we can use it to connect to ours on the Vantiq platform.
Step 1: Clone the Extension Sources Repository
Log into GitHub and navigate to the Vantiq repos. Vantiq/vantiq-extension-sources is what you want. Clone the code to a directory in your filesystem.
In the repo directory, move to the vantiq-extension-sources directory and run
Note: This isn’t going to work if you don’t have JAVA JDK 17 installed, and your JAVA_HOME environment variable set to the correct JAVA path. Here’s a Linux example:
Step 2: Move & Uncompress the Generated Program Files
Running the gradle command in the last step created file builds in both zip and tar formats. Copy one of those from <yourDir>/vantiq-extension-sources/camelConnector/build/distributions to wherever you want the program to live on your machine, and uncompress it there.
Step 3: Create a Server Config File
Go to the the install location and create a server.config filename. It will look like this:
Step 4: Create a Source Type for the IDE
Create a JSON doc with a name like “CamelGEO.json” and contents like:
If you haven’t done so already, install the Vantiq CLI and update your profile with the info you need for the Namespace and access token you’ve got for the server.config file already. Then run:
Hop into your Namespace for a sec and choose Add -> Source. Take a look at the available types:
You should see that your source is now a selectable choice.
Step 5: Create a New Source and Reference a Routes Document
Well, now that you can create a CamelGEO source, let’s do that. I’m calling mine CamelGEO,
(because I’m super creative that way.)In the configuration pane for the Properties tab, we need to add some JSON. The properties that can be set are listed in Vantiq’s camelConnector GitHub repo README. In our case, we’re keeping it pretty simple:Bear in mind that the componentName is the name of the 3rd party entity to which you are connecting; make sure it’s spelled correctly, case and all.
You might also be tempted to add authentication information in the componentProperties, but that only works at the endpoint level, not at the component level.
All we need to set is the camelRuntime.routesDocument with the name of the YAML file that defines the Geocoder Camel Component routes we’re going to use. The appName would have defaulted to camelConnectorApp. If I’d needed to add security information like a ClientId or access token, that would be added into other properties. (Again, see that README file.)
Step 6: Create the Routes Document
Remember how in the last step, we made a property for routesDocument? Well, that actually has to exist, as a project document. These documents could be in XML or YAML formats. Here, I’m using YAML.
I’ll put the text at the very bottom of this article, so you can copy it, but just in case, I’m showing a screenshot of this, to make sure the spacing is exact:
Hooboy, what can I say about getting the routes right? So many pitfalls:
• steps should be two spaces under from (AI “help” gets this wrong a lot; don’t ask me how I know.)
• Be sure to put all access tokens, API keys, etc. in this file
• Vantiq is expecting a java.util.Map sent back, so the setBody section is returning the header map, which is in the right format.
• Spacing in general is soooooo picky, picky, picky, and far too often cutting and pasting in some of the lines results in misalignment.
Step 7: Start the Apache Camel Application
In your terminal window, navigate to where you installed and expanded the .zip or .tar distribution from Step 2. Make sure your server.config file is at the installation directory level run:
The application should say it successfully connected to the source in your project Namespace, and will stay up, sharing helpful DEBUG messages for everything that happens to that source from now on.
Step 8: Enjoy your New Source
I have a simple procedure for entering a value and getting a Geocode back, or vice-versa:
And here’s what it looked like when it was run:
Conclusion:
Using Vantiq’s Camel Assembly options makes for much less work, but in cases where the “kamelet” isn’t available, you can still integrate a 3rd party Camel Connector with your Vantiq project. Read the Camel Connector documentation for your entity carefully, read the Vantiq instructions for the Camel Connector in the GitHub repository carefully, and you should be fine!
Click here to download the YAML file I used. I had to upload it as .txt file, but just change the extension to .yml.
Attachments:
You must be logged in to view attached files.